
Installation
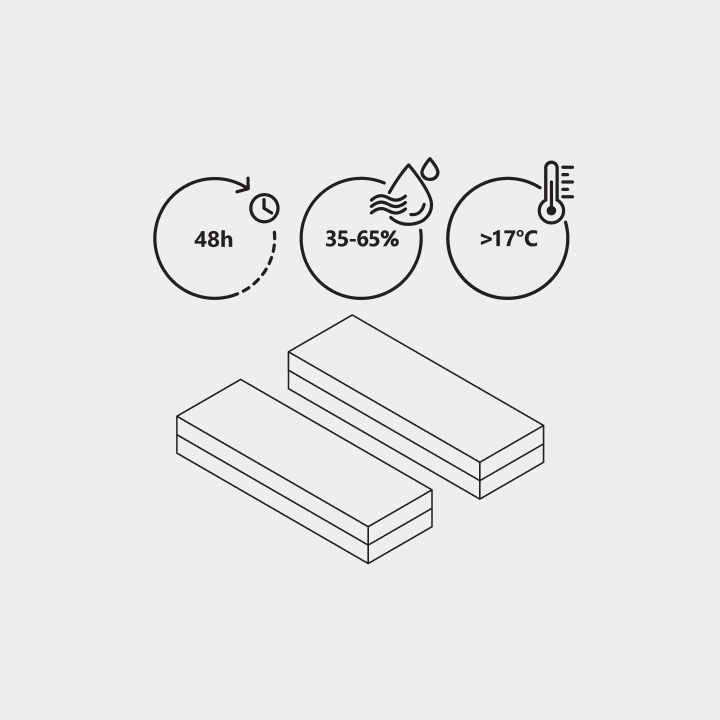
We recommend acclimatizing wood panels to the new environment for 1-2 days, keeping them packed. Room temperature must be above 17°C and 35 - 65 % relative humidity must prevail. This will ensure that the panels get used to the climate of the new room. Use elastic polymer-based mounting adhesive to glue the panels to the wall. Do not use dispersion-based (water based) adhesives, as this can lead to deformation of the panels!
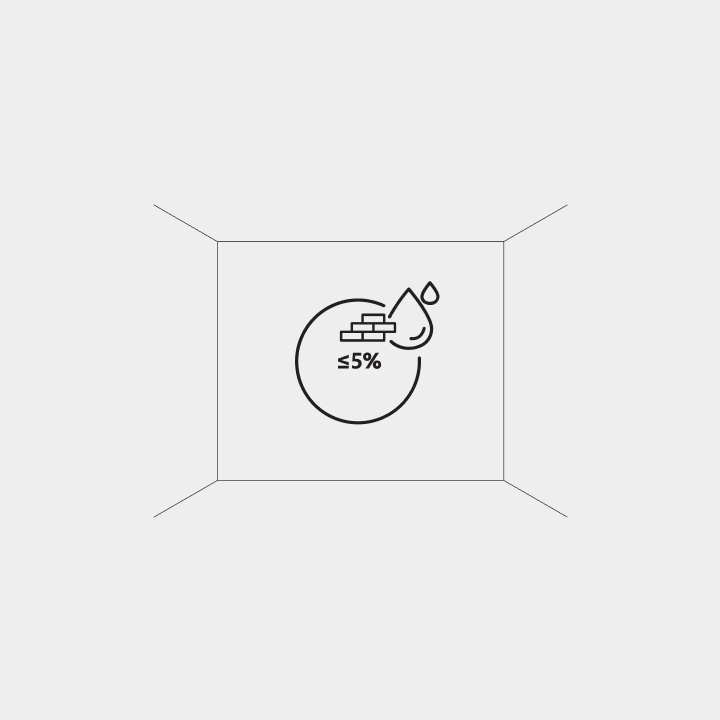
Make sure that the surface on which you will install the panels is relatively flat. The surface must also be clean, dry (a maximum residual moisture of 5 %) and free of dust. The product is intended for use in rooms with relative humidity from 35% to 65%. The panels are made of natural wood, that is why use them in high humidity places is not recommended.

Use polymer-based flexible mounting adhesive to glue the panels to the wall. Do not use dispersion-based (water based) adhesives, as this can lead to deformation of the panels. When choosing an adhesive, follow the adhesive manufacturer’s instructions about the surface onto which you plan to glue the panels, as well as the required amount of adhesive. Apply the glue as instructed. Make sure that the glue is also applied to the corners of the panels.
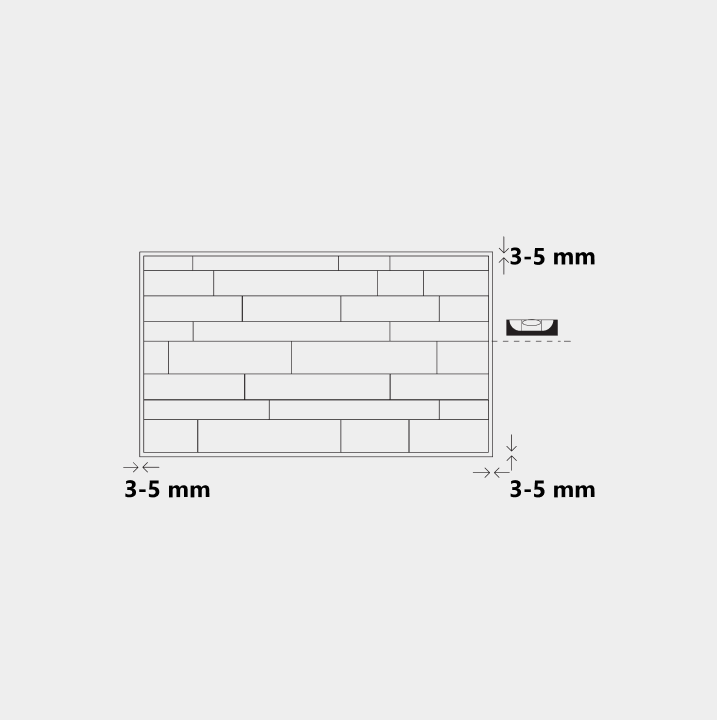
Start assembling the panels from the bottom up, leaving 3-5 mm gaps between the floor and walls. Use a spirit level for the job. Finish laying the panels with a gap of 3-5 mm from the ceiling. The decorative (facade) side of OZO model panels is structured, ribbed! Pay attention to it!

You can arrange the panels on the wall inyour own unique pattern (horizontally, vertically, diagonally, or in any pattern ofyour choice) or as shown in the diagram. If the panels are of the same width (pic. A). If the panels are of different widths (pic. B).When starting a new row, we recommen dusing the previous (same width) row cuttings. In the process of laying, for models with different thicknesses or materials (acoustic), lay them alternately or in your own unique pattern.
Wall panels can be sawn in several ways. Make markings on the panel to know where to saw. Saw the panel with a hand saw, circular saw, or jigsaw. Before sawing, read the operating instructions for the saw of choice. Since the panels are made of natural wood, some panels may bend slightly due to moisture and tension in the wood. If the bending of the panel does not allow it to be attached to the wall, cut it in half and place it according to the general pattern, this will not change the overall appearance of the wall in any way.

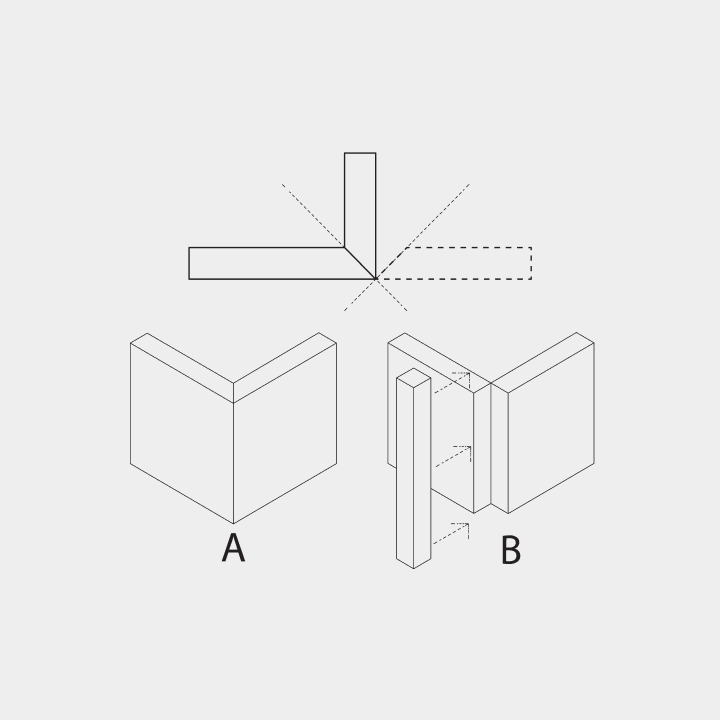
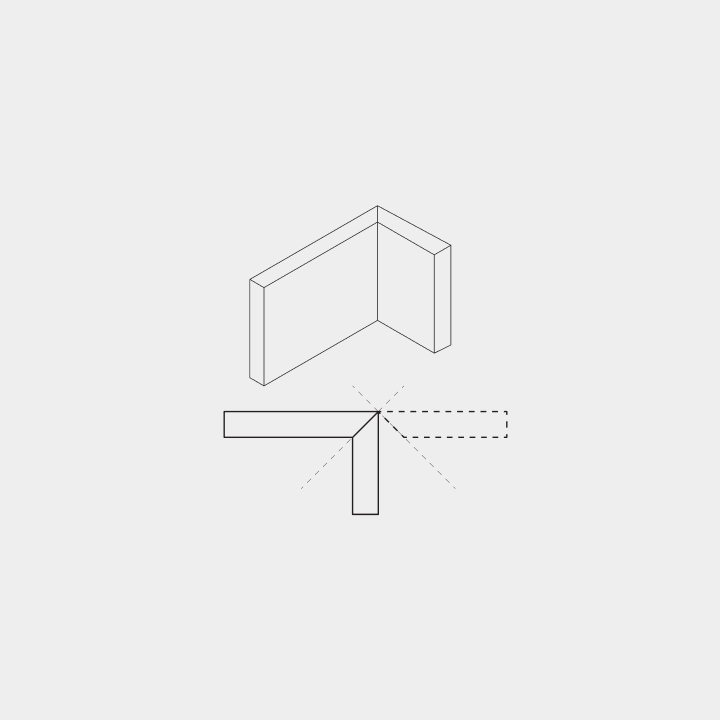
Outer angle could be made by applying panel in 45-degree angle (pic. A) or by using decorative moldings. (pic. B).
The inner corner is created by sawing the panel at a 45-degree angle.
FAQ
Usage
You can use our WWD panels on most indoor surfaces that are relatively smooth, dry and free of dust and debris. It can be applied to ceilings, walls, back splashes, islands, desks, etc.
Yes, you can in case if there is no open flame.
The product is intended for use in rooms with relative humidity from 35% to 65%. The panels are made of natural wood, that is why use them in high humidity places is not recommended.
They can be glued to any surface, such as plaster walls, chipboard, wood, painted walls, concrete walls, etc. the main condition is for the wall to be flat and clean of dust and of course the wall must be dry (a maximum residual moisture of 5 %).
Not really. But if You use double tape, then it could be removable later.
Yes, you can apply paint or any other treatment if you wish. We suggest at first try to do at little piece of wall panels to ensure that result will meet your expectation.
Panels work by dampening and deadening sound waves, helping to eliminate any back noise and echoes.
You can use a static brush or a vacuum cleaner.
Installation
Yes, you can. Please follow manual instruction and tips about necessary tools for it.
Please refer to installation video here for step-by-step instructions on how to install.
We recommend acclimatizing wood panels to the new environment for 1-2 days, keeping them packed. Room temperature must be above 17°C and 35 - 65 % relative humidity must prevail. This will ensure that the panels get used to the climate of the new room.
Panels prides itself on having some of the very best reclaimed/oak wood on the market however with wood being wood there may be the odd chance of bowing but as long as you follow us how to guide then this is not a problem.
The decorative side of OZO and OZO lite/mini is structured, which means that it is grooved and you can feel it when you run your finger over the surface.
Start assembling the panels from the bottom up, leaving 3-5 mm gaps between the floor and walls. Use a spirit level for the job.
Wall panels can be sawn in several ways. Make markings on the panel to know where to saw. Saw the panel with a hand saw, circular saw, or jigsaw.
No, wall just must be clean and free of dust. If you do decide to paint, we recommend letting the paint fully cure for at least 30 days before applying the planks.
Use elastic polymer-based mounting adhesive to glue the panels to the wall. Do not use dispersion-based (water based) adhesives, as this can lead to deformation of the panels! We recommend to use our WWD polymer base glue.
The paper is a compensation that equalizes the tension in the panel. It does not need to be ripped off!
Package
The panels are packaged by 1m2 in card box. The box dimensions depend on panel model sizes.
It' s depend on model. Under each panel model is information about amount of panels in one box.
You can locate sizes of panel under the each model.
In one box comes 1m2 of panels.
Quantity
You can find the m2 for your project by multiplying the length times the width. We recommend adding 5% of your project’s m2 as a waste factor due to any scraps that occur when cutting.
If You will use our WWD glue, which one is highly recommend for our panels. You can calculate it take m2 of panels dived with 1,75 and You will get amount of cartridges necessary for gluing panels.
Yes, we offer samples. You can purchase a sample set here. Or choose a selected sample model here.*Please note if you would like to test the adhesive it is industrial strength. It is designed to be a permanent application and removing it could damage your wall.
Order processing
You can pay with a VISA or Mastercard bank card, as well as with the most popular banklink payment methods.
The goods should arrive within 1 week Europa and 1-2 days in Latvia. The deliveries in Europe may in some cases take more than one week.
You will receive an email with tracking details once your parcel has left the warehouse.
To cancel or edit your order submit a request, and our WWD Team will get back to you as soon as possible. After dispatch, delivery options and changes can be managed according to the instructions in carrier's preadvise email/text message. Note: Cancellation or Item Change is possible only for orders that have not been dispatched.
Delivery time
We ship the goods immediately upon receipt of payment. Delivery time depends on your location. But you will be able to track your shipment by the carrier's tracking number.
Damaged shipment
Do not worry. All shipments is insured. 1. If possible make note on delivery manifest about damaged parcels. 2. Take a pictures of damaged boxes, items and delivery label. Send those photos to us asap. Claims for damaged shipments are accepted within five days of delivery.
We will review the pictures and get back to you. Depending on the situation, we will offer to send a replacement product or return the money.